Sunday, 29 November 2020

Layer One complete!

 I have now finished both the chemise (camisa) and the petticoat (saia) which is my first layer done.

To put the petticoat together I whip stitched the edges of all the pieces by hand and then whip stitched them together to make up the body of the skirt.

Seam inside skirt

I had to trim some fabric off the hem as the gores were making it uneven.  To finish the hem I got one of the strips of fabric I had cut off the edge of the fabric and ironed the raw edge inside it as you would with bias binding.  This ironed edge I then whip stitched to the hem of the skirt as a binding.  
Hem binding

I then got some strips of wool batting and folded that inside the back of this binding.  This is similar to a technique used in 16th century Florence Italy where the extant Red dress at Pisa has a doppia or felt padded hem with a satin covering inside the hem, copertura della doppia  (See Landini and Niccoli, Moda a Firenze 1540-1580, p. 74).  The wool I used is more like a stuffing than a felt but I wanted the bulk to give the petticoat some body. I also could not at that time find any wool felt in the shops so this was a good alternative!  This wool batting keeps the petticoat out from the feet and hopefully provides volume under the skirt of the gown.  I am hoping to get the A-line shape of the skirt which is so common across 16th century Europe.  I then whip stiched the back edge of this binding strip inside the skirt to form the hem
                                                                      Wool inside hem
Hem with padding

To make the waist band I got the other strip of the edge of the fabric.  I measured my waist to get the correct dimensions and cut a front and back waist band out of the strip.  I wanted to interline the waist band in a firmer fabric as the taffeta lacks the necessary structure.  I had some wool/silk blend off cuts from my red silk dress so cut a waist band out of this.  I then folded and ironed the strip of embroidered fabric over this to provide an edge and then whip stitched the petticoat fabric to the wool/silk to form one edge of the waistband.  

Interlining of waistband

I looked at the length of the top of the skirt compared to the waistband.  At the front it was an easy match but at the back the skirt was much bigger so I ran a gathering running stitch by hand and pulled in the skirt to the correct dimension.

To attach the waist band I whip stitched the edge of the waistband to the skirt all the way around and then folded over the waistband, pressed it and sewed into place on the inside of the skirt by (guess what!) more whip stitching!

I had left a 7 inch opening on both sides of the front panel.  A friend of mine recommended this as it allowed for a greater flexibility of size of waist band.  I used my awl to make a eyelit hole on the waist band on either side of these openings. I sewed around the eyelit holes with red embroidery thread that matched the red flowers on the dress. I also made two strips of left over waist band to serve as placards inside these openings.  I had some velvet ribbon I had sewn in half some time ago so I got two lengths of this and threaded it throught the eyelit holes to make two tied closures on both sides of the front.  I put aglets at the end of these pieces of lacing to make them last longer and keep the ties in the skirt.

Tie and placard
Eyelit hole and lacing

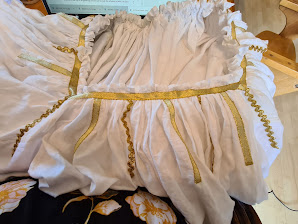
Overall, I am really pleased with the petticoat.  I love how it sits and think the Alcega pattern has a lovely shape to it.  I love the fabric I chose which although it is not authentic makes for a very pretty petticoat and particularly like how I used the edge as the waistband and hem.  I would in future put a bit more fabric in the back of the skirt and make the lacing cord a bit shorter.  I am however very happy with how this garment has turned out.

Skirt front
Layer 1 front
Layer one back
Skirt back


Saturday, 31 October 2020

Undergarments Part 2: Petticoat

 I decided I wanted to make a petticoat as part of my under layer.  I have a red silk petticoat I often wear under my dresses and I find it does a great job of adding shape to my skirts.  I have had some fabric that I've been meaning to turn in to one for some time now so this seemed like a great opportunity!  I have no evidence that Portuguese women wore a petticoat but it is interesting that Alcega has a number of examples of under and over skirts in Libro de Geometria which is only separated from my chosen area by 60 years and one border.  It seems to be very plausible that Portuguese women would have worn some kind of underskirt to support the over layers.  I am also not planning on making a kirtle to go under my dress as I want to wear it in one of the hottest parts of the year.  Hopefully my petticoat will give me extra volume in my skirt without adding extra warmth!

I had a good look through the faldellin and vasquina patterns in Alcega.  I was very taken with the vasquina de feda para muger gorda which is pattern number 58.  This translates as a "kirtle of silk for a fat woman". 

 Image from https://www.wdl.org/en/item/7333/view/1/132/

I am in fact a fat woman so this greatly appealed to me!  

The fabric I am using is pretty but not especially authenic.  It is an embroidered polyester taffeta.  Normally I would prefer to use silk but as it was taffeta meant it had the body I wanted to provide support.  Its other big selling point was the embroidery which is done by machine and not authenic in design.  It is however very pretty and reasonably priced.  The last two points overcame my concern about authenticity.  As it is a petticoat it is not going to be seen by anyone except me and my nearest and dearest so it is not the end of the world!

Isn't it lovely?

I used the waist and length measurement from my red petticoat to make up the pattern using the diagram in Alcega for the shape of the pieces.  I chose to cut off the border on the edge of the fabric which I will use as a waistband and hem binding.  I then measured the width of the left over fabric and based my pattern on this.


I first made the pattern on paper as I wanted to get a feel for what it looked like and then used this paper pattern to cut out the fabric.


I chose not to follow Alcega's layout to the letter as I wanted to work with the pattern.  I also had enough fabric to cut out the back gores the right way up so the pattern followed the big front and back sections.  The smaller front gores are upside down but I decided it wouldn't matter so much.

I am now going to use the same hand sewing construction method as my chemise where I will hem together all the pieces individually and then whip stitch them together.  My red petticoat is made like this and has proved very durable!


Calontir Challenge - Chemise is done!

 I was aiming to finish the chemise by 1 November and I just squeaked in, finishing it at 8pm 31 October!  After I whip stiched the pieces together I hand sewed three rows of gathering stitch about half inch down from the edge of the neckline.  This creates a frill when the stitches are pulled tight.

Whip stitch the pieces together

Gathering stitch

               
To get the right neckline I measured around the neck of my red silk dress as I am going to use that pattern for this gown.  I pulled the gathering stiches until the neckline was a square in the right shape.  I made a square the shape of the neckline out of gold trim by mitreing the corners.   I sewed the top edge of this over the top of the gathering stitches and through the gathering to hold it in place.  

Mitred corner and neck line

To make the rays around the neckline that are seen in Catherine's portrait I cut 5 inch lengths of gold ribbon and gold rick rack.  I sewed four sections of rick rack to run down from the corner of the neckline.  Along the straight sections of the neckline I sewed alternating ribbon and rick rack (aside from the back corner where I had to have two rows of rick rack together) before sewing the bottom edge of the neckline trim over the ends of these.   This was all done by hand.
Hand sewing trim
Neckline with 'rays'


I was then super excited as I thought I had finished!!!!..... and then I put it on...  The underarm gussets were just too small and I hadn't offset the sleeve and the body of the chemise enough to run from my shoulder to my arm put.  OH NO!  Rather than unpick the neckline I decided to remove the underarm gussets and replace them with much bigger versions as should allow me arm movement.  The linen I used for this is whiter than the body but I figure if you are close enough to my arm pit to find out we have bigger problems.  This gusset runs nearly the length of the sleeve and the body.  While bigger than necessary it allows me plenty of movement.

Giant gusset of DOOM!

I have not gathering the cuff of the chemise as I am hoping to do large pendant sleeves for my dress and will need the open chemise cuff to fill the space.  It is interesting that where we see the wrists of chemises in Portuguese 1520s dresses the cuff looks to just be hemmed and without any form of decoration.  You can see this on St Catherine.


The chemise is now completed and I am pretty happy with it.  It doesn't quite look at stunning as Queen/St Catherine's but once I get the dress over the top I think that will made the trim stand out.  


Aramis my loyal sewing companion!


Southron Gaard A&S Challenge

 My Portuguese hat and dress were made as part of the Southron Gaard A&S challenge and my write up on both can be found here or you can read them via google docs.  The dress write up is this one and the hat is here.


Monday, 12 October 2020

Calontir Challenge Plan - Chemise

 I have decided to enter the Calontir Clothing Challenge and am aiming to make a 1520s Portuguese outfit to be complimented by a 16th century Portuguese dinner.  I have entered for the Historically Focussed Advanced section as I wanted to extend my skill set.  I feel this challenge is a good way to continue to educate people about the wonders of Portuguese dress!

I decided that rather than focus on one painting I would incorporate elements from a variety of different Portuguese period images in my dress design.  This will hopefully result in an outfit suitable for a wealthy upper class lady from Lisbon.  

Layer 1: Chemise

I bought some very nice linen/cotton blend when on holiday in Auckland.  It is the right weight for chemises and feels like it has a good amount of linen in it.  


I have found that most of the linen in our local shops tends to be heavy so doesn't have the right body to make a chemise.  This is really important in Portuguese where you often have the chemise puffing through gaps in the sleeve!


Section from the Martrydom of the 11,000 Virgins, St Auta Altarpiece by the Master of St Auta.  (Image from -https://commons.wikimedia.org/wiki/File:Bottega_di_lisbona,_retablo_di_sant%27auta,_1522-25,_pellegrinaggio_di_s._orsola_a_roma_e_martirio_delle_11.000_vergini_1.jpg)


I decided for this challenge that I wanted to use the chemise in the portrait of Queen Catherine of Austria, Queen of Portugal as inspiration.  I loved the placement of trim on it which looks like the rays of the sun.  I felt this will compliment the gold of the brocade I am using for my dress.


St Catherine of Alexandria (possibly Catherine of Austria, Queen of Portugal) by Domenigo Carvalho (Image from https://es.wikipedia.org/wiki/Domingo_Carvalho#/media/Archivo:Catalina_de_Austria,_reina_de_Portugal,_como_Santa_Catalina_(Museo_del_Prado).jpg) 


I have started this chemise by cutting the material out in to 6 pieces.  Two body pieces which are the width of the fabric x measurement from collar to knee, two sleeves - the width of the fabric x length of arm, two gussets of 8 inches squared.    I then hand hemmed all of these pieces using a whip stitch.  This technique is used on the extant Italian 16th century chemise on pages 110-111 in Janet Arnold's Patterns of Fashion 4. There are no extant Portuguese clothing items that I am aware of (please let me know if you are aware of any!!) so I am having to look at nearby regions for costruction techniques. 

My next steps are to whip stitch this pieces together and then gather the neckline/add trim.


Monday, 27 July 2020

My other website

I also an interesting in 16th century Italian dress and food.  You can check this out on my other page here

Wednesday, 15 July 2020

Portuguese Dress

Here are the two Portuguese dresses I made for our recent Baronial Anniversary.  The grey one is a day dress and undergown for the pink silk dress.  The pink silk dress is based on an image in The Visitation by Gregorio Lopes dating from 1525-30. Documentation can be read here

.

Tuesday, 7 April 2020

Portuguese Dress Pinterest Board

One of my lockdown projects has to been to reorganise my Pinterest boards!  I started with my one on Portuguese Dress as I want this to be my big research project for the year.  I am particularly wanting to focus on Women's fashion in Portugal between 1520 and 1540 and to help me do this I am creating an inventory of useful dress images.   I am hoping to slowly create a wardrobe of Portuguese dresses and dress accessories!  My nicely arranged Portuguese dress board can be found here.

Monday, 30 March 2020

Portuguese Mince on Toast

We are currently in a COVID-19 lockdown so I thought it was time to break out the comfort food while in isolation.  Mince on toast has always been a family favourite so I was pleased to see a variant on this in the Um tratado da cozinha portuguesa do século XV.

Picadinho de carne de vaca

Lavem carne devaca bem macia, e piquem-na bem miudinha. A seguir adicionem-lhe cravo,açafrão, pimenta, gengibre, cheiro-verde bem cortadinho, cebola batida, vinagree sal. Refoguem tudo no azeite, e deixem cozinhar até secar a água. Sirvamsobre fatias de pão.


Beef mince (English translation found here)

Wash the tender cow's meat, and mince it well. Next add cloves, saffron, black pepper, ginger (I've never heard of cheiro-verde, it translate literally as"green-smell") well chopped, crushed onion, vinegar and salt. Saute everything in the olive oil, and let cook until it the juices dry. Serve over sliced bread.

My redaction

Ingredients


500gm beef 
1 t each of cloves, pepper and ginger
A pinch of saffron
1 T of parsley, chopped (less if dried)
1 onion, finely chopped
1 T vinegar (balsamic is nice, I also used a mix of pinot grigio and malt)
1 t salt
1 T olive oil

Method
Cook onion in olive oil until translucent then add mince and brown.
Add spices and cook until fragrant.
Add parsley and vinegar and continue to cook until mince is fully cooked.
Serve over bread/toast or I made flat breads which were delicious with it.

The mince has a lovely spicy flavour and the tang of the vinegar works well with fattier mince.


Thursday, 12 March 2020

Persona Name Article

This is an entry for the Persona Challenge

When I am forgotten, as I shall be, and sleep in dull cold marble, … Say, I taught thee.
The teaching or sharing of knowledge or skills that your persona would have had, for example, classes, published articles etc.
I wrote this article on the process I went through to choose my 16th century Portuguese name and then registered it.

Creating and Registering my Portuguese name

Tuesday, 3 March 2020

Another Recipe for Moorish Chicken - Portuguese 15th century recipe


This was to enter the Southron Gaard Persona challenge category

1. Do you think because you are virtuous, that there shall be no more cakes and ale?
An item of food or drink your persona may have grown, prepared, consumed, or known of
.

There is one Portuguese cookbook from period called Um tratado da cozinha portuguesa do século XV or Livro de cozinha da Infanta D. Maria de Portugal which can be found, with an English translation at http://www.medievalcookery.com/notes/tratado.html. This collection of recipes was written in the late 15th century and then taken to Italy with Maria, the grand daughter of Manuel I of Portugal, when she married Alessandro Farnese. It ended up in Naples. (See reference to this here or in At the  First Table:Food and Social Identity in Early Modern Spain by Jodi Campbell).

I was having a friend of over for dinner so decided to cook the Moorish Chicken recipe from this book as I have tried it before and it is delicious.

Outra receita de galinha mourisca
Façam em pedaçosuma galinha bem gorda, e levem-na ao fogo brando, com duas colheres de sopa degordura, algumas fatias de toucinho, bastante coentro, um punhadinho de salsa,umas folhinhas de hortelã, sal e uma cebola bem grande. Abafem-na e deixem-na dourar, mexendo-a devez em quando. Em seguida cubram essagalinha com água, e assim que levante fervura acabem de temperá-la com sal,vinagre, cravo-da-índia, açafrão, pimenta-do-reino e gengibre. Logo que agalinha esteja cozida, derramem dentro 4 gemas batidas. Tomem uma travessa funda, forrada com fatiasde pão e derramem por cima a galinha.

Another recipe for moorish chicken - literal translation
Cut a very fat chicken into pieces, and cook it over low heat, with two soup spoons of fat, a few slices of bacon, lots of cilantro, a bit of parsley, a few mint leaves, salt and a very large onion. Cover it (abafar means smother) and let it brown, stirring once in a while. Next cover that chicken in water, and as soon as it reaches a boil finish seasoning it with salt, vinegar, cloves, saffron, black pepper and ginger. When the chicken is cooked, add 4 beaten egg yolks. Take a deep serving tray, lined with bread slices and put the chicken over top.

My redaction to feed 4

500gm chicken breast
1T olive oil
100gm bacon
¼ cup of coriander
2T parsley
1T mint
Pinch of salt
2 cups of chicken stock
1T white wine vinegar
1 t salt
1t each of cloves, pepper and ginger
A pinch of saffron
4 egg yolks
1 loaf of bread.

  1. Cut chicken and bacon in to chunks (I used chicken breasts as I wanted it to cook quickly) '
  2. Roughly cut the herbs and dice the onion. (I didn’t add coriander the first time as my guest did not like it so included more parsley. I did up it in in a later attempt at this recipe and it added a nice flavor)
  3. Heat up the oil in a thick based casserole dish on the stove top 
  4. Brown chicken and bacon
  5. Add in herbs, salt and onion
  6. Put the lid on the casserole dish and cook at medium heat for about 10 minutes. Stir occasionally to stop the chicken from sticking.
  7. Add in the stock (I used stock rather than just water as I was using breast meat which doesn’t have the flavor of chicken drums)
  8. When the stock boils add in the vinegar, salt and spices. Leave to cook for 5 minutes
  9. Separate the egg yolks and whisk together
  10. Pour the egg yolks into the casserole and mix up the sauce thoroughly. If you do not the egg will cook in lumps rather than being spread through sauce.
  11. Slice a loaf of good bread up. Either serve the chicken in a deep dish with bread underneath or serve the chicken to the table in a pot with a loaf of bread so guests can assemble their own. The bread is very delicious when soaked in the sauce!