Saturday 31 October 2020

Undergarments Part 2: Petticoat

 I decided I wanted to make a petticoat as part of my under layer.  I have a red silk petticoat I often wear under my dresses and I find it does a great job of adding shape to my skirts.  I have had some fabric that I've been meaning to turn in to one for some time now so this seemed like a great opportunity!  I have no evidence that Portuguese women wore a petticoat but it is interesting that Alcega has a number of examples of under and over skirts in Libro de Geometria which is only separated from my chosen area by 60 years and one border.  It seems to be very plausible that Portuguese women would have worn some kind of underskirt to support the over layers.  I am also not planning on making a kirtle to go under my dress as I want to wear it in one of the hottest parts of the year.  Hopefully my petticoat will give me extra volume in my skirt without adding extra warmth!

I had a good look through the faldellin and vasquina patterns in Alcega.  I was very taken with the vasquina de feda para muger gorda which is pattern number 58.  This translates as a "kirtle of silk for a fat woman". 

 Image from https://www.wdl.org/en/item/7333/view/1/132/

I am in fact a fat woman so this greatly appealed to me!  

The fabric I am using is pretty but not especially authenic.  It is an embroidered polyester taffeta.  Normally I would prefer to use silk but as it was taffeta meant it had the body I wanted to provide support.  Its other big selling point was the embroidery which is done by machine and not authenic in design.  It is however very pretty and reasonably priced.  The last two points overcame my concern about authenticity.  As it is a petticoat it is not going to be seen by anyone except me and my nearest and dearest so it is not the end of the world!

Isn't it lovely?

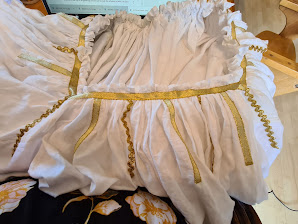
I used the waist and length measurement from my red petticoat to make up the pattern using the diagram in Alcega for the shape of the pieces.  I chose to cut off the border on the edge of the fabric which I will use as a waistband and hem binding.  I then measured the width of the left over fabric and based my pattern on this.


I first made the pattern on paper as I wanted to get a feel for what it looked like and then used this paper pattern to cut out the fabric.


I chose not to follow Alcega's layout to the letter as I wanted to work with the pattern.  I also had enough fabric to cut out the back gores the right way up so the pattern followed the big front and back sections.  The smaller front gores are upside down but I decided it wouldn't matter so much.

I am now going to use the same hand sewing construction method as my chemise where I will hem together all the pieces individually and then whip stitch them together.  My red petticoat is made like this and has proved very durable!


Calontir Challenge - Chemise is done!

 I was aiming to finish the chemise by 1 November and I just squeaked in, finishing it at 8pm 31 October!  After I whip stiched the pieces together I hand sewed three rows of gathering stitch about half inch down from the edge of the neckline.  This creates a frill when the stitches are pulled tight.

Whip stitch the pieces together

Gathering stitch

               
To get the right neckline I measured around the neck of my red silk dress as I am going to use that pattern for this gown.  I pulled the gathering stiches until the neckline was a square in the right shape.  I made a square the shape of the neckline out of gold trim by mitreing the corners.   I sewed the top edge of this over the top of the gathering stitches and through the gathering to hold it in place.  

Mitred corner and neck line

To make the rays around the neckline that are seen in Catherine's portrait I cut 5 inch lengths of gold ribbon and gold rick rack.  I sewed four sections of rick rack to run down from the corner of the neckline.  Along the straight sections of the neckline I sewed alternating ribbon and rick rack (aside from the back corner where I had to have two rows of rick rack together) before sewing the bottom edge of the neckline trim over the ends of these.   This was all done by hand.
Hand sewing trim
Neckline with 'rays'


I was then super excited as I thought I had finished!!!!..... and then I put it on...  The underarm gussets were just too small and I hadn't offset the sleeve and the body of the chemise enough to run from my shoulder to my arm put.  OH NO!  Rather than unpick the neckline I decided to remove the underarm gussets and replace them with much bigger versions as should allow me arm movement.  The linen I used for this is whiter than the body but I figure if you are close enough to my arm pit to find out we have bigger problems.  This gusset runs nearly the length of the sleeve and the body.  While bigger than necessary it allows me plenty of movement.

Giant gusset of DOOM!

I have not gathering the cuff of the chemise as I am hoping to do large pendant sleeves for my dress and will need the open chemise cuff to fill the space.  It is interesting that where we see the wrists of chemises in Portuguese 1520s dresses the cuff looks to just be hemmed and without any form of decoration.  You can see this on St Catherine.


The chemise is now completed and I am pretty happy with it.  It doesn't quite look at stunning as Queen/St Catherine's but once I get the dress over the top I think that will made the trim stand out.  


Aramis my loyal sewing companion!


Southron Gaard A&S Challenge

 My Portuguese hat and dress were made as part of the Southron Gaard A&S challenge and my write up on both can be found here or you can read them via google docs.  The dress write up is this one and the hat is here.


Monday 12 October 2020

Calontir Challenge Plan - Chemise

 I have decided to enter the Calontir Clothing Challenge and am aiming to make a 1520s Portuguese outfit to be complimented by a 16th century Portuguese dinner.  I have entered for the Historically Focussed Advanced section as I wanted to extend my skill set.  I feel this challenge is a good way to continue to educate people about the wonders of Portuguese dress!

I decided that rather than focus on one painting I would incorporate elements from a variety of different Portuguese period images in my dress design.  This will hopefully result in an outfit suitable for a wealthy upper class lady from Lisbon.  

Layer 1: Chemise

I bought some very nice linen/cotton blend when on holiday in Auckland.  It is the right weight for chemises and feels like it has a good amount of linen in it.  


I have found that most of the linen in our local shops tends to be heavy so doesn't have the right body to make a chemise.  This is really important in Portuguese where you often have the chemise puffing through gaps in the sleeve!


Section from the Martrydom of the 11,000 Virgins, St Auta Altarpiece by the Master of St Auta.  (Image from -https://commons.wikimedia.org/wiki/File:Bottega_di_lisbona,_retablo_di_sant%27auta,_1522-25,_pellegrinaggio_di_s._orsola_a_roma_e_martirio_delle_11.000_vergini_1.jpg)


I decided for this challenge that I wanted to use the chemise in the portrait of Queen Catherine of Austria, Queen of Portugal as inspiration.  I loved the placement of trim on it which looks like the rays of the sun.  I felt this will compliment the gold of the brocade I am using for my dress.


St Catherine of Alexandria (possibly Catherine of Austria, Queen of Portugal) by Domenigo Carvalho (Image from https://es.wikipedia.org/wiki/Domingo_Carvalho#/media/Archivo:Catalina_de_Austria,_reina_de_Portugal,_como_Santa_Catalina_(Museo_del_Prado).jpg) 


I have started this chemise by cutting the material out in to 6 pieces.  Two body pieces which are the width of the fabric x measurement from collar to knee, two sleeves - the width of the fabric x length of arm, two gussets of 8 inches squared.    I then hand hemmed all of these pieces using a whip stitch.  This technique is used on the extant Italian 16th century chemise on pages 110-111 in Janet Arnold's Patterns of Fashion 4. There are no extant Portuguese clothing items that I am aware of (please let me know if you are aware of any!!) so I am having to look at nearby regions for costruction techniques. 

My next steps are to whip stitch this pieces together and then gather the neckline/add trim.